A Step-by-Step Guide to Getting CGM Readings on Your Smartwatch
Jun 24, 2023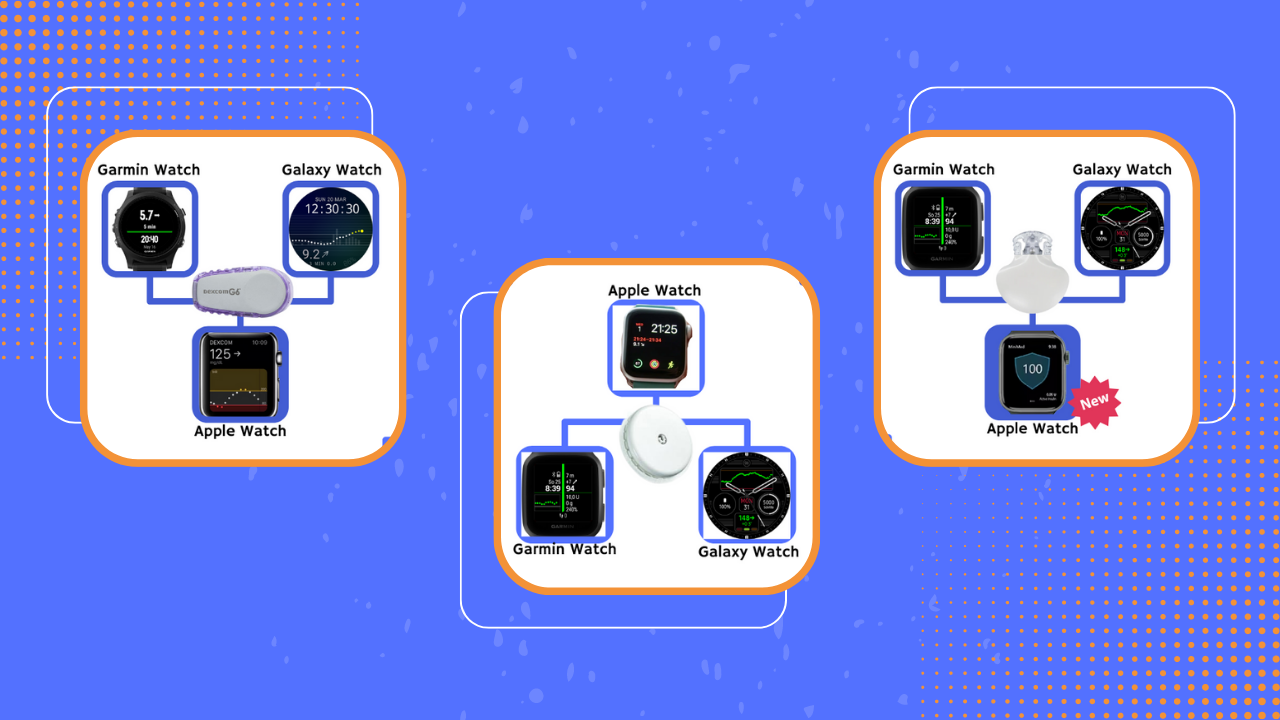
Looking for a convenient way to view your glucose data on your smartwatch?
Look no further!
This guide will walk you through the process of syncing your glucose data from devices such as Dexcom G6, Dexcom ONE, (European) Libre2, and Guardian 4 sensor with a variety of smartwatches.
We have thoroughly tested this setup with popular smartwatches including the Garmin Venu SQ watch, the Galaxy Watch 4, and the Apple Watch SE.
Rest assured, these instructions will help you get real-time access to your Continuous Glucose Monitoring (CGM) data while exercising or going about your daily activities.
It's important to note that these methods don't directly transfer your sensor data to the smartwatch. Instead, they rely on a mobile phone to receive the data and relay it to the smartwatch. Keep in mind that if your phone is in a different room, you won't be able to see your sensor data on the smartwatch.
While certain companies offer integration of their apps with smartwatches (such as Dexcom and Medtronic), the options we'll be discussing involve the use of open-source apps like xDrip+ and Diabox. Please be aware that these apps are not FDA or European authorities approved, and their use carries inherent risks. Our intention is to inform you about these options, not necessarily endorse them.
Get Access To Updated Diabetes Technology Courses
DEXCOM G6: Connecting to Your Smartwatch
Start the Dexcom G6 sensor with the official Dexcom G6 app and activate your Dexcom Share account by adding a follower (this can be yourself).
#1 Garmin Smartwatch:
-
Install the Garmin Connect app and the Garmin Connect IQ app on your Android phone or iPhone.
- Download the Dex CGM Watch Face from the Connect IQ store on your phone. You can find a tutorial on how to do this here.
- In the settings of the Dex CGM Watch Face, enter your Dexcom username and password.
- If the Dex CGM Watch Face does not automatically appear on your Garmin watch, you can manually select it from the available watch faces. You can find a tutorial specifically for the Garmin Venu watch here.
- Alternatively, you can download the Dexcom Widget or Dexcom Data Field from the Connect IQ store. You can find official tutorials for these options by clicking on the provided links.
- If you have a Garmin Edge cycling computer, you can also use the Dexcom Data Field feature to display Dexcom data on it.
#2 Samsung Galaxy Smartwatch (4 or 5):
- Install the Galaxy Wearable app on your Android phone.
- Download the Blose app on your smartwatch and enter your Dexcom credentials directly on your smartwatch.
- Find the Blose watch face in the available watch faces and install it. You can refer to a full tutorial for this process here.
Alternatively, you can try the following options:
- G-Watch Wear app: Install the G-Watch Wear app on both your phone and your smartwatch, and enter your Dexcom credentials via the settings. You can find a tutorial for using this app here, and more information for customizing the watch face here.
- Wearable Widgets app: Use the Wearable Widgets app in combination with the G-Watch Wear app to display Dexcom data as a complication or a tile on your Samsung Galaxy smartwatch. You can find tutorials on how to set up and use the Wearable Widgets app here and here.
- Dexcom G6 app via Wear Installer (2) app: If you prefer a typical Dexcom watch face on your smartwatch, you can install the Dexcom G6 app on your phone using the Wear Installer (2) app. This method requires some additional steps and customization. You can find a tutorial on how to do this here and here.
#3 Apple Watch:
-
Open the Watch app on your iPhone. Find the Dexcom G6 app and install it on your Apple Watch.
-
Once installed, you can access the Dexcom app on your watch by finding it among the app icons. Tapping on the Dexcom app will display your Dexcom sensor graph. You can find a tutorial here.
-
You can also integrate your Dexcom sensor data into a complication on a modular watch face. Detailed instructions can be found here and here. It's important to note that Apple Watch complications can only update their information every 15-45 minutes. To view the most recent blood glucose reading, you will need to tap the complication to see a larger Dexcom sensor graph.
-
Alternatively, you can download the Sugarmate app from the App Store to display your sensor data as a calendar appointment. Follow the instructions provided in the app (see tutorial here). This involves connecting the Sugarmate app to your Dexcom account and creating a new calendar in your iCloud account using the Sugarmate app. In some modular watch faces, you can change the middle complication to "my calendar" to view your real-time Dexcom data.
DEXCOM ONE: Using Dexcom G6 Transmitters for Smartwatch Compatibility
While there's no direct way to sync Dexcom ONE transmitter data with your smartwatch, you can follow these steps to enable compatibility:
#1 Obtain Dexcom G6 Transmitters:
Purchase official Dexcom G6 transmitters or Anubis transmitters.
- Note that Anubis transmitters are modified Dexcom G6 transmitters and are not approved medical devices by the FDA or EMA. Use them at your own risk.
- Anubis transmitters have extended battery life of 180 days (battery is replaceable by yourself) and attached sensors last 60 days (sensor accuracy may decrease after 10 days).
- Anubis transmitters have a shorter warm-up time of 1 hour compared to the standard 2 hours.
- Anubis transmitters can be recognized by the word "Anubis" on top, and the transmitter serial number is engraved on the transmitter itself.
- You can purchase Anubis transmitters for 125 euros by filling out a form, support is available via the Followers of Anubis Facebook group.
#2 Connect Dexcom ONE Sensors to Dexcom G6 Transmitters:
You can use either the Dexcom G6 transmitter or the Anubis transmitter with your Dexcom ONE sensors.
Follow the provided instructions to pair the sensors with the transmitters.
By following these steps, you can transform your Dexcom ONE sensor into a Dexcom G6 sensor with the capability to transmit the data to your smartwatch, as described in the previous section.
(European) LIBRE 2: Syncing with Your Smartwatch
To view your (European) Libre2 sensor data on your smartwatch, follow these detailed steps:
Start your Libre2 sensor using the official LibreLink app.
1-2 hours after starting the sensor:
- Disconnect the Libresensor from your phone (Turn off the alarms in the LibreLink app and toggle off the Bluetooth connection of the LibreLink app in the Bluetooth settings)
- Scan the sensor with an xDrip-like app (e.g., Diabox for Android phones or Shuggah for iPhones). This will enable real-time CGM functionality with your Libre2 sensor.
Important notes:
- These third-party apps, such as Diabox and Shuggah, are not supported by Abbott and are not approved by the FDA or EMA. You use them at your own risk.
- These apps do not send sensor data to LibreView. If you want a full graph in LibreView, you will still need to scan your Libre2 sensor with the LibreLink app every 8 hours.
#1 Garmin Smartwatches:
-
Install the Garmin Connect app and the Garmin Connect IQ app on your Android phone. (Please note that for iPhone additional steps are required.)
- Download the Diabox app on your phone by surfing to diaboxapp.com. Configure the app to share data with smartwatches in the settings menu (settings > integrations > toggle on "share data with smartwatches").
- Download the xDrip+/Spike/Nightscout Watch Face from the Connect IQ store and install it on your Garmin watch. You can find a tutorial on how to do download a new watch face here, and more instructions on this specific watch face here.
- Alternatively, you can download the xDrip+/Spike/Nightscout Widget or Data Field from the Connect IQ store to view your Libre2 sensor data in a widget or during an activity.
- If you have a Garmin Edge cycling computer, you can utilise the xDrip+/Spike/Nightscout Data Field feature to display Libre2 data on it.
#2 Samsung Galaxy Smartwatch (4 or 5):
- Install the Galaxy Wearable app on your Android phone.
- Download the Diabox app from diaboxapp.com and configure it to share data with GWatch. You can find more information here.
- Install the G-Watch Wear app on both your phone and your smartwatch. Set Diabox as the data source in the app settings. You can find a tutorial for using this app here, and more information for customizing the watch face here.
- You can use the Wearable Widgets app in conjunction with the G-Watch Wear app to display Libre2 data as a complication or a tile on your Samsung Galaxy smartwatch. You can find tutorials on how to set up and use the Wearable Widgets app here and here.
#3 Apple Watch:
- Download the Shuggah app from the App Store on your iPhone and scan the sensor using the Shuggah app.
-
Open the Watch app on your iPhone: find the Shuggah app and install it on your Apple Watch.
-
Once installed, you can access the Shuggah app on your watch by finding it among the app icons. Tapping on the Shuggah app will display your Libre sensor glycemia and treand arrow.
-
To have easier access to your glucose data, you can integrate the Shuggah logo as a complication on a modular watch face.
- If you prefer to view your glucose data in real-time without tapping on your watch, you can configure the Shuggah app to create calendar events. Simply go to the app settings and toggle on the "create calendar events" option. You can find a tutorial here for more detailed instructions. On a modular or photo watch face, you can change the middle complication to "my calendar" to see your real-time sensor data.
- Please note that the Shuggah app utilizes its own algorithm to calculate blood glucose readings, which may result in slight differences compared to your Libre 2 readings.
GUARDIAN 4: Enabling Smartwatch Connectivity
To enable smartwatch connectivity for the Guardian sensor with a MiniMed 780G insulin pump, follow these steps:
- Download the MiniMed Mobile app and connect it with your MiniMed 780G insulin pump.
- For Apple Watch integration with the MiniMed 780G, a new integration was released recently. Make sure you have the latest version of the MiniMed Mobile app installed.
- For Android watches, utilizing a third-party app like xDrip+ is necessary for connectivity. It's crucial to acknowledge that xDrip+ is not supported by Medtronic and lacks approval from regulatory authorities such as the FDA or EMA. Therefore, usage of these apps carries inherent risks and should be approached with caution. It's worth noting that xDrip+ functions as a hub connecting multiple devices. Detailed instructions on utilizing xDrip+ can be found in the comprehensive manual at xdrip.readthedocs.io.
#1 Garmin Smartwatches:
- Download the xDrip+ app from github.com/nightscoutfoundation/xdrip. You can find a video on how to download the app here.
- Set the data source of xDrip+ to "Companion App" in the settings. This will allow xDrip+ to receive sensor data from the MiniMed Mobile app.
- Download the xDrip+/Spike/Nightscout Watch Face from the Connect IQ store and install it on your Garmin watch. You can find a tutorial on how to do download a new watch face here, and more instructions on this specific watch face here.
- Alternatively, you can download the xDrip+/Spike/Nightscout Widget or Data Field from the Connect IQ store to view your Guardian sensor data in a widget or during an activity.
- If you have a Garmin Edge cycling computer, you can utilise the xDrip+/Spike/Nightscout Data Field feature to display Guardian data on it.
#2 Samsung Galaxy Smartwatch (4 or 5):
- Download the xDrip+ app from github.com/nightscoutfoundation/xdrip. You can find a video on how to download the app here.
- Set the data source of xDrip+ to "Companion App" in the settings. This will allow xDrip+ to receive sensor data from the MiniMed Mobile app.
- Adjust the settings within the xDrip+ app to send data to the G-Watch App as explained here.
- Install the G-Watch Wear app on both your phone and your smartwatch. Set xDrip as the data source in the app settings. You can find a tutorial for using this app here, and more information for customizing the watch face here.
- You can use the Wearable Widgets app in conjunction with the G-Watch Wear app to display Libre2 data as a complication or a tile on your Samsung Galaxy smartwatch. You can find tutorials on how to set up and use the Wearable Widgets app here and here.
#3 Apple Watch (new option since June 2023!):
-
Ensure that you have the latest version of the MiniMed Mobile app installed on your iPhone. Check if the MiniMed Watch app is mentioned in the settings of the app.
-
Open the Watch app on your iPhone and locate the MiniMed Mobile app among the available apps. Install the MiniMed app on your Apple Watch.
- Once installed, you can access the MiniMed app on your Apple Watch by finding it among the app icons. Tapping on the MiniMed app will display your glycemia within your SmartGuard shield. Swiping to the left will show your sensor graph and Time In Range.
-
To have easier access to your glucose data, you can integrate your sensor glycemia and SmartGuard Shield as a complication on compatible watch faces. These watch faces include Portrait, Nike (hybrid), Breathe, Utility, Simple, Photos, Motion, Gradient, XL, and Astronomy. Clicking on the complication will allow you to access the full MiniMed Watch app.
- You can watch the full tutorial here.
Important Considerations
- When syncing your smartwatch with a CGM system, it is crucial to verify compatibility between the devices.
- Exercise caution when relying on open-source apps and modifications that have not been approved by medical authorities. Such apps may carry potential risks and should be used with discretion.
- Setting up a connection between your phone and smartwatch may require patience and experimentation. Connectivity issues can arise, especially with updates to the operating systems of your devices. Sensor companies may also modify their software, rendering certain integrations no longer possible. To navigate these challenges, consider joining online communities on platforms like Facebook, Discord, or Telegram. Connecting with peers can provide valuable support and assistance when encountering difficulties.
- If you are not comfortable using unapproved apps at your own risk, an alternative approach is to set alarms as notifications on both your phone and smartwatch. For exercise routines, adjusting your low alert to a higher threshold, such as 90-100 mg/dL (5-5.5 mmol/L) instead of the standard 70 mg/dL (3.9 mmol/L), can help ensure timely notifications for consuming necessary carbohydrates. This simpler setup can also be beneficial for preserving the battery life of your phone and smartwatch.
With this comprehensive step-by-step guide, you can access your CGM data on your smartwatch, enabling better diabetes management. While Dexcom (and Medtronic) offers native integration, users of other CGM brands can still enjoy similar functionality using open-source apps. Prioritize safety, consult healthcare professionals, and stay empowered with real-time glucose readings at your fingertips.
If you'd like a handout to easily give to patients to further explore these options, you can download a printable PDF of this step-by-step guide HERE.
Kind regards,
![]()